

Trivia: Did you know finger flexor pulley injuries are among the most common climbing injuries, coming in at an estimated 33% of all rock climbing injuries?1,2 Additionally, it is almost exclusively a rock climbing-specific injury, as it often requires crimping forces, which are not typical during everyday activities. If you haven’t had personal experience with it, you may have seen it present when seeing people climbing with tape rings along their fingers.
Through this article, you will find a compilation of the current research and expert advice regarding the following questions:
- What are flexor pulleys?
- How are they commonly injured?
- What do the injuries look like?
- How long does it take to heal from a pulley Injury?
- What does the rehab process look like?
- What can I do to help prevent this from happening?
What are flexor pulleys?
In short, these pulleys are the strong, fibrous bands of connective tissue called annular ligaments that allow your finger flexor muscles to curl your fingers towards your palm efficiently. Typically, you may think of ligaments as securing bone to another bone; however, these pulleys create a unique sling that anchors the finger flexor tendons to bone, much like the eyelets on a fishing rod.2
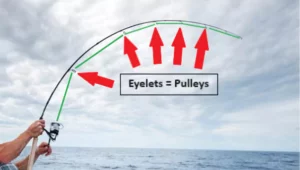
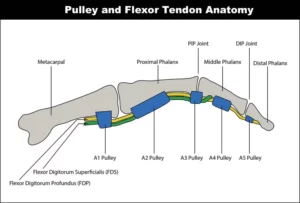
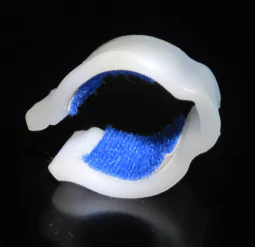
(Left) Much like the eyelets guide the fishing wire to the pole without adhering it to the rod, so too does the pulley hold the flexor tendons close to the bone while still allowing them to glide freely. (Right) The flexor pulleys (blue) are anchored along the fingers to provide a guide for the finger flexor muscle tendons (yellow and green). (Image 1. Image 2 Adopted from Google)
This unique development allows our muscles to maximize their force when closing the hand without separating from the fingers. If you remove one of these pulleys, the tendons will separate from the bone in a fashion commonly referred to as “bowstringing”.3
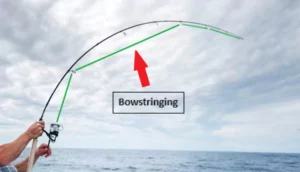
If one of these eyelets/pulleys were to fail, the wire/tendon would not be held close to the bone, creating this bowstringing effect. This would cause pain and decreased strength in the finger. (Image 3. Image 4 Adapted from Google)
Five types of annular pulleys (aptly called A1-A5) are located along the palm side of each finger and two different types along the thumb.3 Of these five pulleys, A2 and A4, withstand the most significant loads and have the most prominent job at preventing bowstringing because of their location along the broad surface of the finger.3 Therefore, an A2 or A4 pulley rupture is the most common pulley injury.5
What Causes Bouldering and Climbing Pulley Injuries?
The short story is that in climbing, flexor pulley injuries are most often classified as “overuse injuries,” and the risk will increase the more someone climbs. When combined with the type of hold, grip, or motion utilized, these risks will change accordingly. In simplest terms, the risk is highest with 1) a full or closed crimp, which will place the most significant amount of static force on the pulleys, and 2) dynamic motions, which will put the most significant immediate force on the pulleys.9 One note is that dynamic motions refer to intentional “dynos” performed in a climb and when you catch yourself following a sudden loss of feet on the wall.
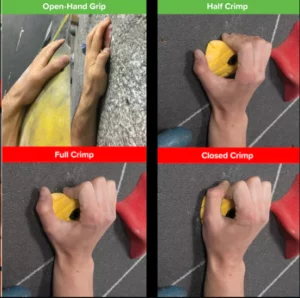
The full and closed crimp hand positions place the greatest force on the A2 pulley, with forces 3 to 4 times greater than at the fingertips.5,7 Studies show that our A2 pulley can withstand approximately 100 lbs of force at a given time. They also show the A2 will repetitively withstand forces greater than this during recreational climbing, increasing the risk of a pulley injury.
The table below shows the average force capacity for the pulleys, followed by the force placed on the tissues while climbing.
Forces along the A2 Pulley5
| Normal Conditions | Recreational Climbing |
| 100 lbs of force | 120 lbs of force |
Conversely, when you catch a dyno or your foot slips, your hands work extra hard to slow your momentum and create control. This is called an eccentric contraction, and one study showed it is the most common cause of pulley rupture among climbers.6 We need to develop better methods for measuring this force spike, and more data needs to be collected other than the injury incidence rate.
This is not to say, “Stay away from crimps and dynos.” Our bodies are designed to adapt to and withstand forces in the short term. Repeatedly loading this force above the normal loading capacity can lead to overuse injuries within the pulley.5 In the next section, we will discuss prevention strategies to reduce this risk even further.
What Does A Pulley Injury Look Like?
A familiar story of a partial to complete pulley tear goes like this: Your foot slips as you set a full crimp on your next hold when you feel and hear a “pop” on the lower palm side of your ring finger. You instinctively let go and feel a dull throbbing. You have had some gradual pain there in recent weeks, but this time, there is a warm stiffness as you try to move your finger. A firm surface pokes along your skin as you flex your finger, which is tender to the touch. Moving feels better if you gently squeeze the finger with your other hand. It may take a few hours, but eventually, bruising sets where the pressure feels the greatest.
Alternatively, a strain may arise as a gradual, dull ache without any popping, either during a climb or following a session. Generally, the discomfort of an A2 pulley strain is localized to the base of a specific finger.
What Are the Types of Pulley Injuries?
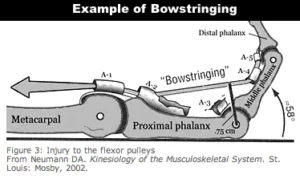
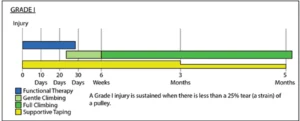
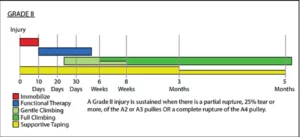
Grades I-IV define pulley injuries based on severity, ranging from strain to multiple pulley ruptures. The first thing to note is that not all Grades cause the bowstringing effect. Strains likely will not show any bowstringing, while partial tears can show varying degrees of bowstringing. Likely, it is only a full tear that will show a complete bowstringing effect. In terms of rehab, current research recommends conservative non-surgical treatment for Grades I-III. It isn’t until the multi-pulley rupture injuries at Grade IV that surgery is recommended. Below are details on each of the classifications.
Grade I – An isolated pulley strain of any of the pulleys5
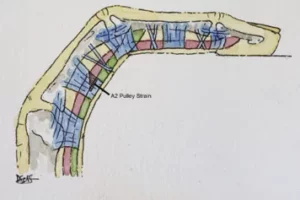
This Grade I injury is manifested as an isolated strain of the distal aspect of the A2 pulley.5 Grade I is commonly treated conservatively with an estimated return to full climbing within six weeks.7,10 (Image 6)
Grade II – A complete rupture of A4, or partial rupture of A2 or A35

This Grade II injury is manifested as a partial rupture of the distal aspect of the A2 pulley.5 Grade II is commonly treated conservatively with an estimated return to full climbing within 6-8 weeks.7,10 (Image 7)
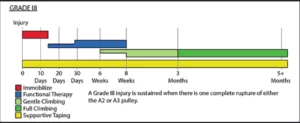
Grade III – A complete rupture of A2 or A35
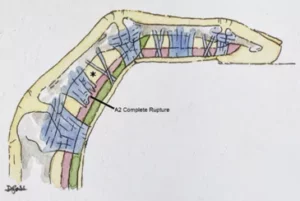
This Grade III injury manifests as a complete rupture of the A2 pulley. As a result of the injury, bowstringing is seen, illustrated by the displacement of the flexor tendons from the bone, resulting in an increased tendon-to-bone distance.5 Despite full pulley rupture, conservative therapy is still the primary recommendation, with an estimated return to full climbing at three months. 7,10(Image 8)
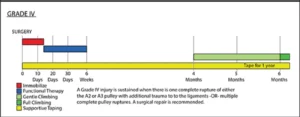
Grade IV – Multiple pulley ruptures, or a single A2 or A3 rupture with involvement of a lumbrical muscle or surrounding collateral ligaments

This Grade IV injury is manifested as a complete A3 pulley rupture and partial ruptures of A4 and A2. Note the most apparent bowstringing effect. Surgery is the leading recommendation for the treatment of a Grade IV injury, with guided rehabilitation afterward. The estimated return to full climbing is within six months to a year.7,10(Image 9)
When Should I Seek Out A Medical Professional?
If you have sustained a finger injury that has caused apparent bowstringing, significantly decreased your grip strength, or limited your ability to open/close your hand for more than 24 hours, consider seeking medical advice from your primary care doctor or a physical therapist specializing in climbing injuries.
What Does Post-Injury Recovery Look Like?
First, let’s address the elephant in the room: surgery. The good news is that our current “leader” in climbing specific injury literature and orthopedic surgeon, Dr. Schöffl, recommends surgery for only Grade IV pulley ruptures, AKA when multiple pulleys are ruptured.10 Following surgery, there is an expected start for return to climbing after six months of healing and active rehabilitation with Physical Therapy.10 Attached is a video by Dr. Jason Hooper, DPT, whose team interviews a climber following their pulley surgery. Interview with Jordan Matthew, Finger Pulley Surgery
For all other Grades, after the initial onset of injury, there is an immediate inflammation process lasting between 1-5 days that will start clearing out damaged tissues to make way for new collagen (the connective tissue that ligaments are made of) to be set. This inflammation will cause pain, warmth, and swelling to the finger. Depending on the person and the severity of the injury, setting these new collagen fibers can take anywhere from six days to six months. The final remodeling of this collagen to a more permanent structure with total load-bearing capacity can take anywhere from six months to one year.2,4,10 These structures require proper protection during their gradual mobilization and loading phases to return to full capacity.
To foster this growth, we have four goals to achieve, each setting the foundation for the next 2,12,13
- Protect and Unload
- Regain Mobility
- Rebuild Strength
- Re-Introduce Climbing
Post-Injury Recovery Phase I: Protect and Unload
First things first, we need to let your injured tissues rest! Regardless of the severity, the first goal should be to decrease pain and swelling. Taking time away from climbing or daily living activities that provoke pain is vital, along with using some ice to bring down any swelling still present.
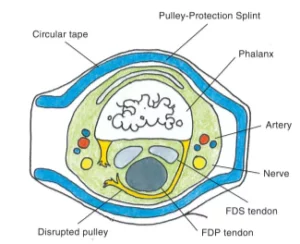
Additionally, supporting the pulley with external support like taping or a Pulley Protection Splint (PPS) is vital to removing the injured tissues’ strain. By using external support to hold the tendon close to the bone, the pulley can heal at a more functionally effective length rather than being overstretched.2
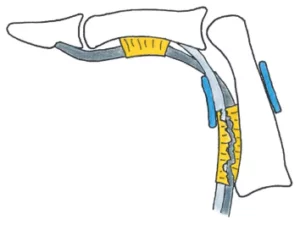
Representation of anatomy following a rupture and the use of a pulley-protection splint (blue) close to the joint line rather than directly over the pulley itself. (Image 10 brought from Schneeberger, 2016)
The duration of how long to wear a splint and the frequency of its use throughout the day are determined by the extent of the injury. Some sources recommend that splinting be used 24/7 for up to two weeks for Grades II and above.9,10 Additionally, expect to wear a splint or have support with tape for up to six months while climbing.
Taping vs. Pulley Protection Splints: Which should you choose?
Compared to taping, Pulley Protection Splints (PPS) are the gold standard and primary defense following a pulley injury.2 They are often metal or plastic rings that act in place of an injured flexor pulley to hold your flexor tendon closer to your finger bones. Their firm structure provides a greater support system than standard taping techniques.4,8,9,10 However, taping, specifically the H-Taping technique, has also succeeded in recovery.9,12,13,14
| Pulley Protection Splint (i.e. Thermoplastic Ring) |
Taping (H-Taping) |
| Pros: -Gold standard supported by research -Effective conservative treatment following rupture -Re-Usable -Reduces constriction to blood vessels or nerves |
Pros: -Improves pulley strength by 13% -Inexpensive -Self-manageable |
| Cons: -Requires fitting for proper use -Cost (around $20 for entry-level) |
Cons: -Minor blood flow and nerve compression -Will loosen with time |
  |
 |
Post-Injury Recovery Phase II: Regain Mobility
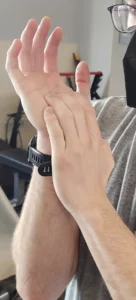
Before beginning any resistive exercises, you must ensure you have a full, pain-free range of motion. The quickest test is to see if you can slowly make a fist. If there is any pain or restrictions, the pulley is not ready to accept the load. Continue with passive motion and tendon gliding to keep your tendons lubricated within their sheaths.
- Passive Motion: Use your other hand to move your affected finger. Start at each knuckle and move your way down to progress to a full stretch and motion without discomfort.
- Tendon Glides: Consider these as rolling your fingers up and down your hand. Tendon glides are good at keeping the fingers moving and the tendons mobile.
Post-Injury Recovery Phase III: Building Strength
Once pain-free mobility is restored, it is time to start loading your tissues to build strength in the pulleys. Here, the guidance of a rehab professional is critical. Our job is to help find the proper challenge progression without overstressing the tissues based on the tissues’ healing time frames. The key is that mild to no pain should occur during or after the exercise. The tissues want to be worked, not overwhelmed.
These initial exercise examples are adapted from Dr. Jason Hooper, DPT of Hooper’s Beta. Click here to see a complete list and progression for the series.12 Make sure proper H-Taping or PPS is used throughout for support.
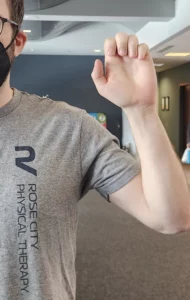
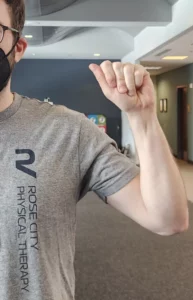
- Sloper and Crimp grips on your opposing palm: If you can tolerate no to mild pain, perform five repetitions of 1-3 seconds, 3-4 times daily. Once you can complete this completely pain-free, move on to the next exercise set.
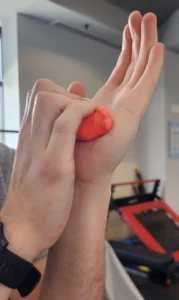
- Puddy Crimps: With a soft molding putty, knead and crimp in your hand for 4-5 minutes, switching from side to side. Perform this three times a day, allowing for very mild discomfort. Move on to the final exercise set when this is no longer painful.
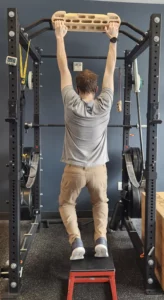
- Farmer Crimps: Using a crimp block and weight, start progressing from five pounds, holding an open crimp for seven sets of 7 seconds on and 3 seconds off. The goal is to progressively build tolerance of holding 25% of your body weight before returning to crimping on the wall.
Rehabilitation Summary
Below is a visual depiction put together by Will Anglin of Tension Climbing.7 Every case and person will differ with different recovery time frames; however, it can give a general overview of what to expect with long-term outcomes.
Finally…Pulley Injury Prevention
One of the most important questions is, “How do I stop this from happening in the first place?” While there is no foolproof way to avoid injuries, here are some ways to reduce the risk. One thing to note: H-taping or using a Pulley Protection Splint during climbing before an injury is not a recommended prevention measure.10,12,13
- Listen to your body! Utilize the strategy, “If it hurts, don’t do it.” If you start getting localized soreness in a finger, listen to your body and rest, recover, and train your tissues to get ahead of the issue before the pain grows. When in doubt, seek out a physical therapist to assist!
- Allow for rest between workout routines. Our bodies need time to rest and heal to adapt and grow stronger. Coaches and researchers show you should rest for 48-72 hours between hangboarding workouts. A similar translation can be made to your project. It may be better to spend less than three days in a row pushing your grade on that crimpy slab problem that has you hitting your head against the wall. 12,13
- Seven Attempt Limit. Give yourself seven reasonable attempts to work on the climb, then move on. We talked about how crimping exceeds the max load of the A2 pulley by 20 lbs on average; limiting your attempts will help reduce the threshold of pulley force and keep them from overloading for too long.12
- Train across all styles of climbing and holds! Introduce variety into your climbing. Within sessions and between days, spend time between slopers, jugs, crimps, pinches, overhangs, slabs, and stems. Introducing diversity into your training allows your fingers and pulleys to have rest from overusing a specific force-generating pattern. It pays off to be well-rounded! 12,13
- Don’t let every crimp be a full crimp. A full crimp places the greatest stress on your hands and pulleys. Vary your usage, alternating, and train with half crimps if the situation allows it. 12,13
- Train your tissues! Don’t let climbing be your only form of exercise. Spend time loading your hands and body to build the foundational strength for your climbing. This strength grows muscle and reinforces your pulleys, tendons, and connective tissues. “If you want to move from sailing the river to sailing the ocean, bring a bigger boat.” Training the tissues is all about building that bigger boat as you climb your grades.12,13
Training Tips
Speaking of training your tissues, here is a simple exercise routine to help reinforce your hand and finger strength..12,13 Remember, rest is key; don’t perform all these on heavy project days.
Exercises to assist with Pulley Strengthening:
- Isometric crimp with isotonic row: An open crimp is held with a crimp block/portable hang board attached to a cable machine or exercise band, and a 1-arm row is performed. During a row, actively bend your elbow to your side, pulling your shoulder blade in the back and down at the end. Perform three sets of 10 at a medium resistance. 3x/week.
- Isotonic crimp with isometric row: With a crimp block/portable hang board attached to a cable machine or exercise band, the arm is held at 90 degrees at the end rowing position. Actively move from an open to closed crimp position. Perform three sets of 10 at an easy-medium resistance. 3x/week.


 Farmer’s Crimp: Arm to side, holding onto crimp block with an open crimp. Perform three sets of ten at 7 seconds on and 3 seconds off. Start with an easy weight and progress from there. Think of 25% body weight as a goal for climbing. 3x/week.
 Farmer’s Crimp: Arm to side, holding onto crimp block with an open crimp. Perform three sets of ten at 7 seconds on and 3 seconds off. Start with an easy weight and progress from there. Think of 25% body weight as a goal for climbing. 3x/week.
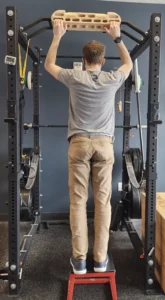
- Hangboarding – Keep your feet on the ground, lowering your weight into an open crimp. As you get stronger and build capacity in the flexor pulley(s), gradually unload the pressure on your feet to increase demand on your fingers. Perform three sets of 4 repetitions…7 seconds on and 3 seconds off. Three minutes rest between sets. 2x/week.
Are You Looking for Effective Climbing Injury Treatment in Portland, Oregon? Contact Rose City Physical Therapy!
“Flexor pulley injury” is the word no climber wants to hear. However, it does not mean it is the end. Plenty of research supports climbers’ recovery following progressive rehabilitation programming. Recovery takes patience and time away from your project but will require active work and effort nonetheless! If you have any questions or concerns, contact the climbing injury specialists at Rose City Physical Therapy. We are here to help.
To get started, schedule your initial consultation today!
Additional Online Resources:
- A2 Pulley Rehab: Everything Climbers Need to Know. By Dr. Jason Hooper, DPT of Hooper’s Beta
- How To Rehab a Climbing Finger Pulley Injury. By Dr. Jared Vagy, DPT of The Climbing Doctor
- Finger Injuries in Climbers. By Dr. Carrie Cooper, DPT
References:
- Jones, G. Schoffl, V. Johnson, M. (2018). Incidence, Diagnosis, and Management of Injury in Sport Climbing and Bouldering: A Critical Review. Current Sports Medicine Reports. 17(11):p 396-401.
- Cheung, W. Que, J. Chen, J. (2023). Finger Pulley Injuries in Rock Climbing: A Guide for Physiotherapists. Walden Cheung Physiotherapy Corp.
- TeachMeAnatomy. (2020, June 7). The flexor pulley system of the hand annular cruciate oblique. https://teachmeanatomy.info/upper-limb/misc/flexor-system-hand/
- Schoffl, V. Schoffl, I. Frank, L. Kupper, T. Simon, M. Lutter, C. (2020). Tendon Injuries in the Hands in Rock Climbers: Epidemiology, Anatomy, Biomechanics and Treatment – An Update. Muscles, Ligaments, and Tendons Journal. 10(2):233-243
- Miro, P. vanSonnenberg, E. Sabb, D. Schoffl, V. (2021). Finger Flexor Pulley Injuries in Rock Climbers. WEM Journal. 32(2):247-258
- Schoffl, I. Oppelt, K. Jungert, J. Schweizer, A. Bayer, T. Neububer, W. Schoffle, V. (2009). The influence of concentric and eccentric loading of the finger pulley system. Journal of Biomechanics. 42(13):2124-2128
- DeStefano, M. Pulley injuries explained – part 1. The Climbing Doctor. https://theclimbingdoctor.com/pulley-injuries-explained-part-1/
- Hartnett, E. Bondoc, S. Feretti, A. (2023) Climbing while healing: An orthotic intervention for rock climbers with a low-grade A2 Pulley injury, a case series. Journal of Hand Therapy. DOI: https://doi.org/10.1016/j.jht.2023.08.005
- Schneeberger, M. Schweizer, A. (2016). Pulley Ruptures in Rock Climbers: Outcome of Conservative Treatment with the Pulley-Protection Splint – A Series of 47 Cases. Wilderness and Environmental Medicine. 27(2):211-218
- Schoffl, V. Schoffl, I. 2006. Injuries to the finger flexor pulley system in rock climbers: current concepts. J Hand Surgery. 31(4):647-654
- Anglin, W. (2020, January 3). A Comparative Review of Pulley Injury Literature. Tension Climbing. https://tensionclimbing.com/a-comparative-review-of-pulley-injury-literature/
- Hooper, J. (2022, June 21). A2 pulley rehab: Everything Climbers Need to Know. Hooper’s Beta. https://www.hoopersbeta.com/library/a2-pulley-manual-for-climbers?rq=pulley
- Vagy, J. (2023, May 16). How To Rehab a Climbing Finger Pulley Injury. The Climbing Doctor. https://theclimbingdoctor.com/how-to-rehab-a-climbing-pulley-injury/
- Cooper, C. Finger Injuries In Climbers. Carrie Cooper DPT. https://www.carriecooperdpt.com/self-treatment-fingers